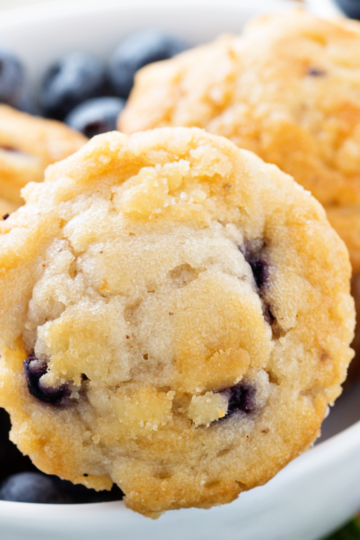
There’s something about lemon bars that feels nostalgic in the best way. They show up at church potlucks. Spring brunches. Baby showers. Easter tables. And somehow, they disappear faster than anything else on the dessert tray.
For years, I thought lemon bars were either too sweet or too runny. The crust would crumble. The filling wouldn’t quite set. Or the top would crack instead of staying smooth and glossy. So I started testing.

More lemon. Less lemon. Extra yolks. No yolks. Par-baked crust. Fully baked crust. Metal pan. Glass pan. This version is the one that finally felt right.
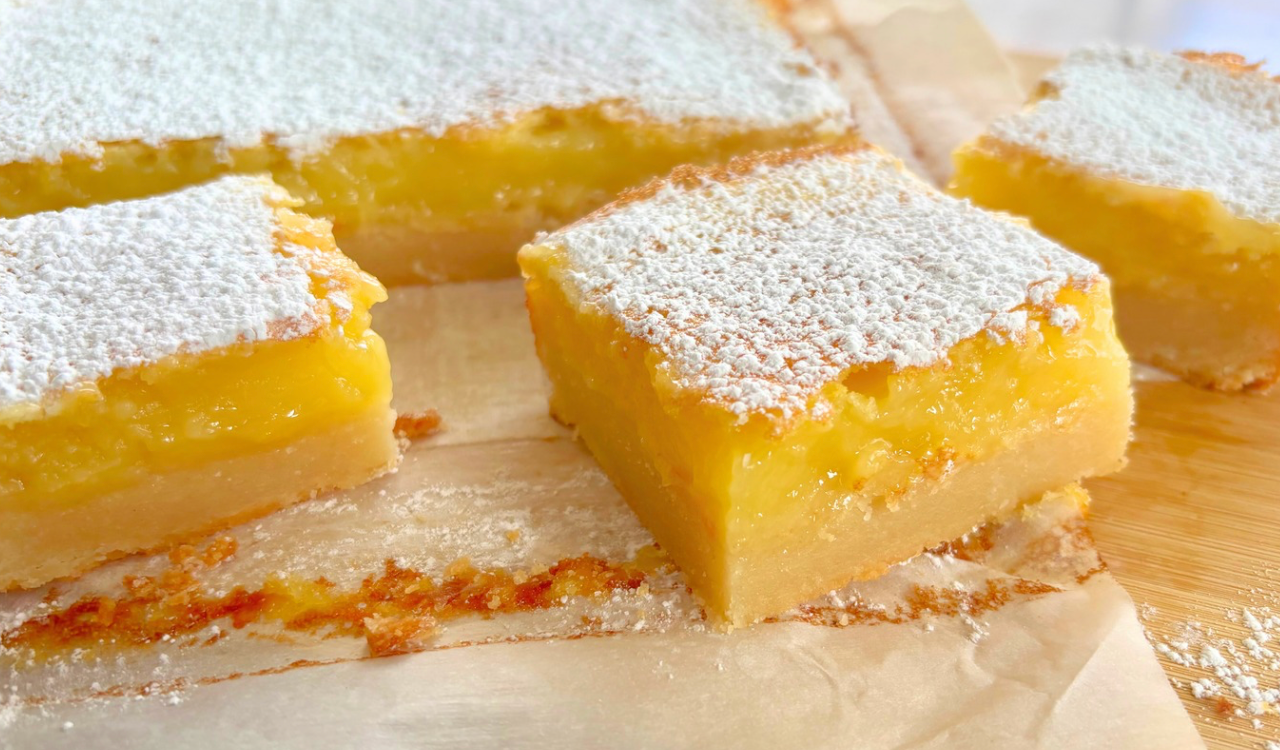
A sturdy, buttery shortbread base. A bright, balanced lemon layer that sets cleanly. A soft, smooth bite without being overly sweet.
These are classic — but better.
Jump to:
- Why You’ll Love This Recipe
- What to Expect (Texture & Flavor)
- Ingredient Breakdown
- Equipment
- Instructions
- Step-by-Step Tips for Perfect Lemon Bars
- Troubleshooting
- Variations
- Substitutions (With Outcome Notes)
- Storage
- Make-Ahead & Storage
- FAQs
- Why This Recipe Works
- Testing Notes
- Final Thoughts
- Related
- Pin to Pinterest
Why You’ll Love This Recipe
- Bright lemon flavor without being sharp
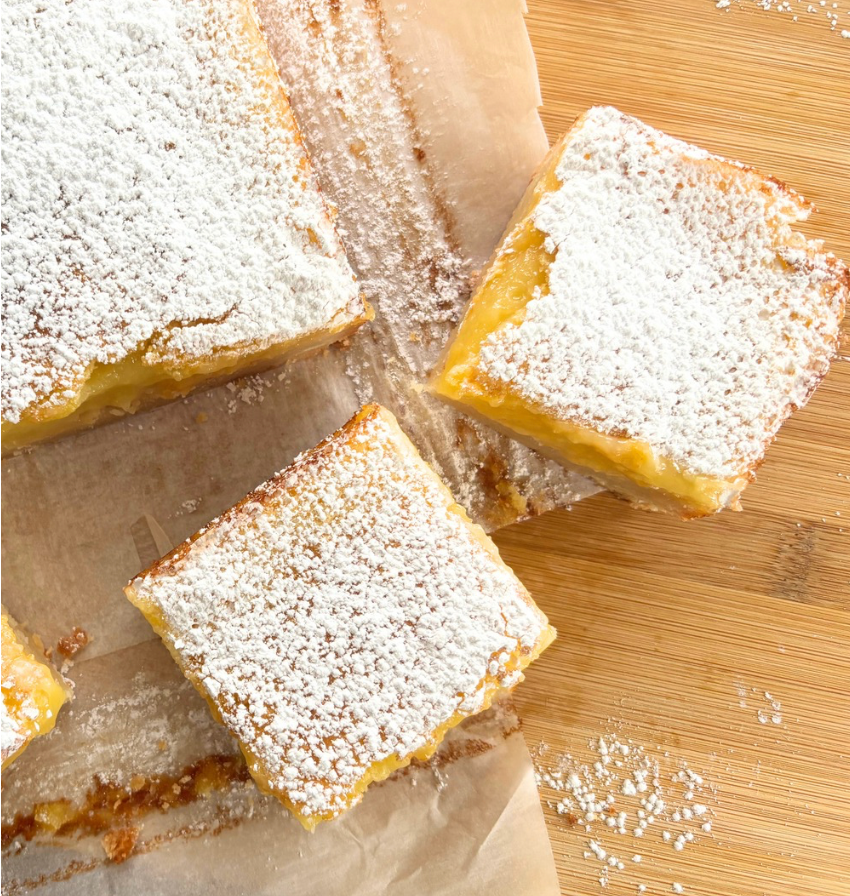
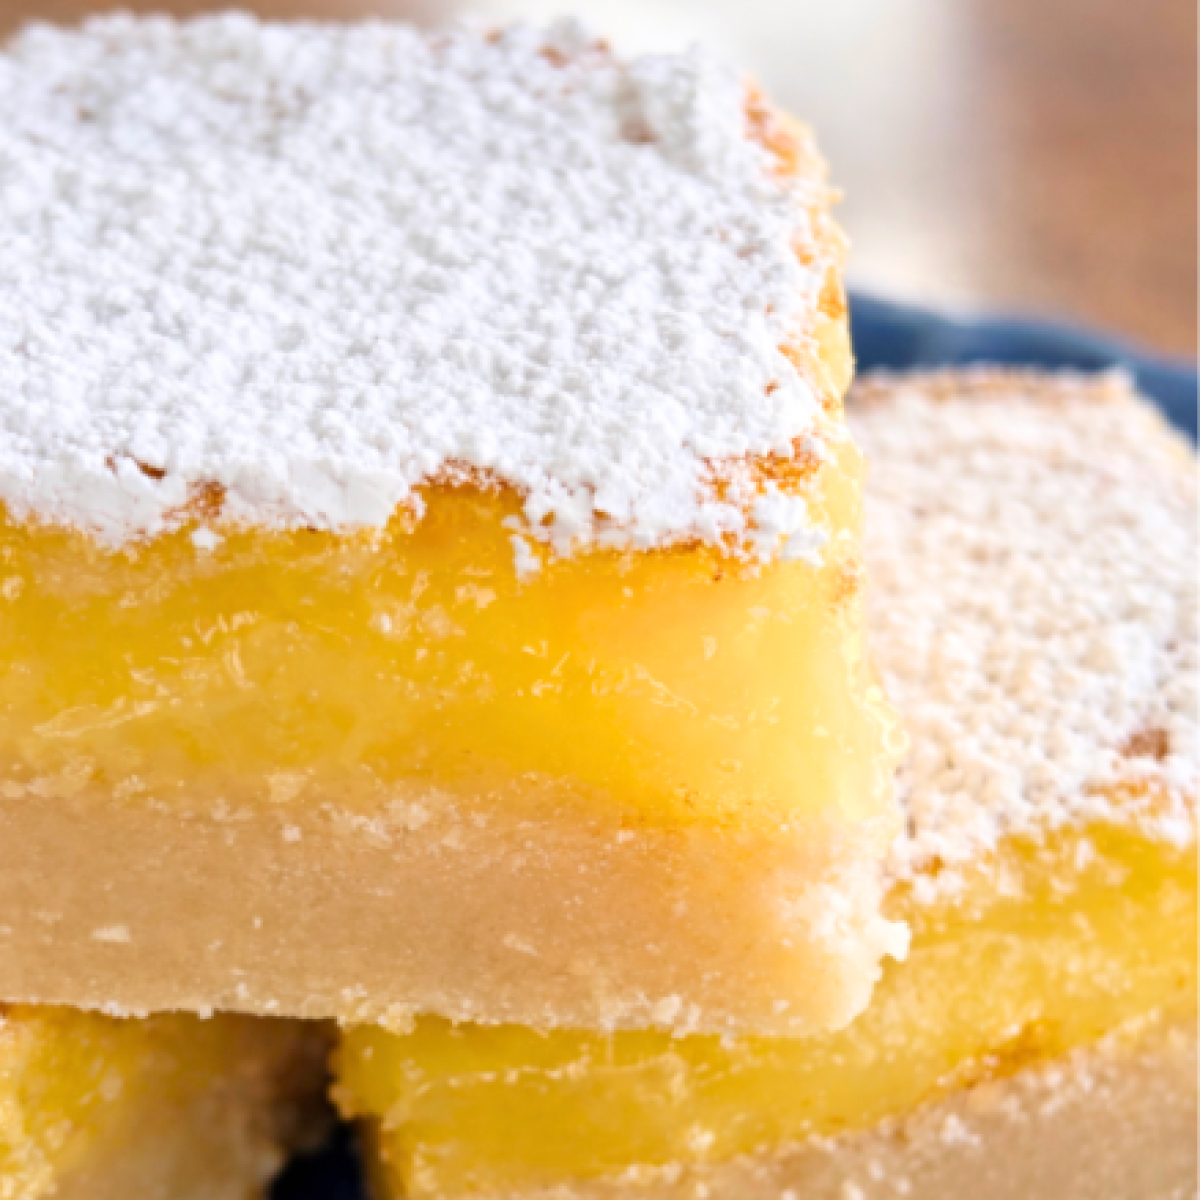
- Thick, creamy filling that slices clean
- Buttery shortbread crust that doesn’t crumble
- Balanced sweetness
- Simple ingredients
- Reliable results
They’re elegant enough for a holiday table and simple enough for a weekday bake.
If you're looking for more elegant citrus desserts try out my Soft and Chewy Frosted Citrus Cookies
What to Expect (Texture & Flavor)
Texture: Firm but creamy center, never runny.
Crust: Buttery, slightly crisp, holds its shape.
Flavor: Fresh lemon-forward, balanced sweetness.
Sweetness level: Moderate — not overly sugary.
Ingredient Breakdown
We’re using simple ingredients — but each one matters.
Unsalted butter
The base of a real shortbread crust. It should be soft but not melted.
Granulated sugar
Sweetens both the crust and the filling while helping create structure.
All-purpose flour
Provides structure for the crust and helps the filling set properly.
Fresh lemons
You need both zest and juice. Fresh is not optional here. Bottled lemon juice will taste flat and slightly bitter.
Eggs
Provide structure and silkiness. They must be fully incorporated to avoid streaks.
Powdered sugar
For finishing. Optional but classic.
Salt
A small amount makes the lemon flavor pop and balances sweetness.
Equipment
- 8x8 metal baking pan
- Parchment paper (with overhang)
- Mixing bowls
- Whisk
- Microplane or fine zester
- Mesh strainer - for dusting
Metal pans bake more evenly than glass and help the filling set properly.
I’ve linked all my favorite baking tools on my Shop My Kitchen page if you’d like to see what I use regularly.
Instructions
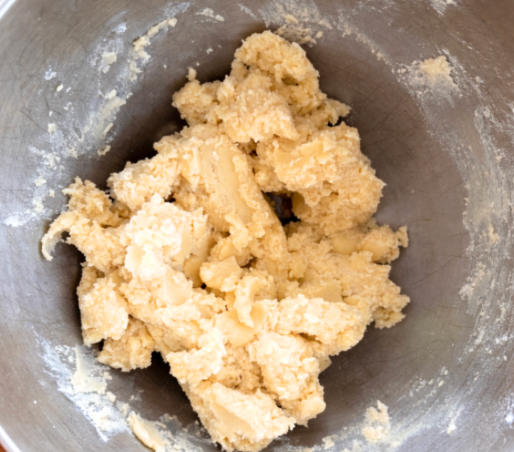
- Step 1: Mix dough base until a crumbly dough begins to form.
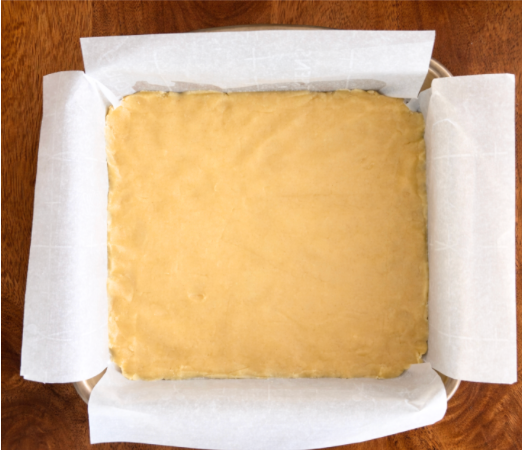
- Step 2: Press dough into parchment lined 8x8 pan. Bake for 18-22 minutes at 350 degrees.
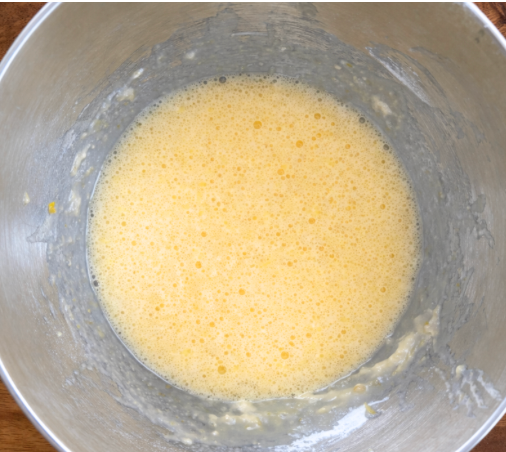
- Step 3: While base is baking, mix up lemon base.
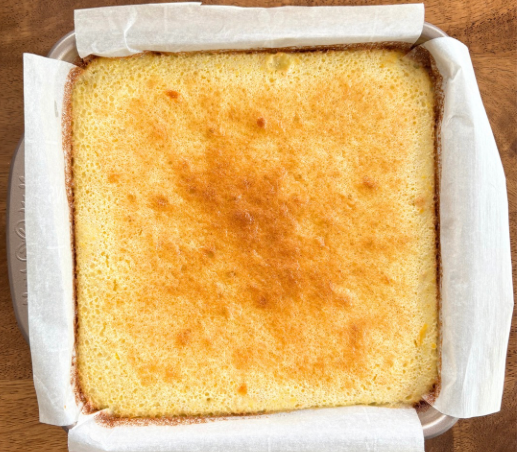
- Step 4: Once base has been par-baked, add lemon base and bake as directed until lightly golden brown and mostly set (very slight jiggle in the middle). Cool completely and then refrigerate for 2 hours before slicing.
Step-by-Step Tips for Perfect Lemon Bars
1. Build a True Shortbread Crust
Cream the butter and sugar until smooth but not fluffy. We’re not making cake here.
Add flour and salt just until combined.
Press the dough firmly and evenly into your prepared pan. Take your time here. An uneven crust bakes unevenly.
Bake until lightly golden. It should look set, not pale.
This is the foundation. Don’t rush it.
2. Use Fresh Lemon Zest First
Rub the lemon zest into the sugar before adding the eggs.
This releases the oils and intensifies the flavor.
This small step makes a noticeable difference.
3. Whisk Gently — Don’t Overbeat
Whisk the eggs into the sugar mixture until smooth, but avoid incorporating excess air.
Too much air causes cracks and uneven texture.
4. Pour Filling Over Hot Crust
Do not let the crust cool completely.
Pour the filling over the warm crust and return it to the oven immediately.
This helps the layers bond and prevents separation.
5. Bake Just Until Set
The center should no longer jiggle loosely, it should give a very slight jiggle in the middle.
Overbaking leads to a rubbery texture.
Underbaking leads to messy slices.
Look for slight firmness with a soft center that will finish setting as it cools.
6. Cool Completely Before Slicing
This is non-negotiable.
Let the bars cool at room temperature, then refrigerate for at least 2 hours.
Cold bars slice cleanly.
Use a sharp knife and wipe between cuts.
Troubleshooting
Why are my lemon bars runny?
They were underbaked or not fully cooled. The center should no longer look wet when removed from the oven.
Why did my filling crack?
Likely overbaked. Pull them when the center is just set.
Why is my crust crumbly?
It wasn’t pressed firmly enough, or it was underbaked before adding the filling.
Why do mine taste metallic?
Often caused by baking in a reactive pan. Use a metal pan lined with parchment.
Variations
Extra Tangy Version
Reduce sugar slightly and increase lemon juice by a tablespoon.
Meyer Lemon Version
Sweeter and floral — beautiful in spring.
Add a Hint of Vanilla
A small splash softens the acidity without dulling brightness.
Gluten-Free Option
Substitute a 1:1 gluten-free flour blend in the crust.
Substitutions (With Outcome Notes)
Can I use bottled lemon juice?
You can, but flavor will be flatter and slightly more acidic.
Can I make these gluten-free?
Use a 1:1 baking flour blend. The crust may be slightly more delicate.
Can I reduce the sugar?
You can reduce slightly, but too much reduction affects structure and set.
Can I use a 9x9 pan?
Yes, but bars will be thinner and bake slightly faster.
Storage
Store covered in the refrigerator for up to 4 days.
They taste even better the next day as the flavors settle.
They also freeze well. Slice first, then freeze in layers with parchment between.
Looking for another dessert that keeps well? Try my Brown Butter Chocolate Chip Cookie
Make-Ahead & Storage
Store in refrigerator up to 4 days.
They slice cleanest when chilled.
Freeze (without powdered sugar) for up to 2 months. Thaw overnight in refrigerator.
Looking for other make ahead desserts? Try my Old Fashioned Sourdough Cinnamon Rolls
FAQs
Why are my lemon bars eggy?
They were likely overbaked or overmixed.
Why is my crust soggy?
The crust wasn’t baked long enough before adding the filling.
Can I double this recipe?
Yes, use a 9x13 pan and adjust baking time slightly.
Can I reduce the sugar?
Slightly, but too much reduction affects structure.
Why This Recipe Works
The balance here matters.
The crust is fully baked before the filling goes on, which prevents sogginess.
The ratio of eggs to lemon juice creates structure without rubberiness.
The flour in the filling stabilizes without making it heavy.
Baking in a metal pan ensures even heat distribution and proper setting.
Everything has a purpose.
Testing Notes
I tested this recipe six times.
- Less sugar made the filling sharp and less stable.
- More lemon juice caused slight sinking.
- Skipping zest reduced overall brightness.
- Glass pans baked unevenly and required longer time.
- Pulling at “just set” produced the best texture after chilling.
The final version balances firmness, brightness, and clean slicing.
Looking for another fool proof old fashioned dessert? Try my Grandmas Molasses Cookie Recipe
Final Thoughts
Lemon bars are one of those desserts that feel both simple and special.
They don’t need layers or decoration. Just a buttery crust, a bright filling, and a light dusting of powdered sugar. When the balance is right — sweet but not heavy, tart but not sharp — they’re hard to stop eating.
These are the kinds of bars that show up at gatherings and quietly disappear. The kind people ask for again. They’re classic for a reason. And once you’ve made a batch that slices cleanly and tastes like real lemon, you’ll understand why some recipes never need replacing.
Shop My Kitchen to see more of my favorite kitchen tools.
The Best Old-Fashioned Lemon Bars
Ingredients
Equipment
Method
- Preheat oven to 350°F. Line an 8x8 baking pan with parchment paper.
- In a mixing bowl, cream butter and sugar until smooth.
- Add flour and salt. Mix just until combined.
- Press dough evenly into prepared pan.
- Bake for 18–22 minutes, until lightly golden.
- While crust bakes, mix lemon zest into sugar until fragrant.
- Whisk in eggs until smooth.
- Add lemon juice, flour, and salt. Whisk gently until combined.
- Pour filling over hot crust.
- Return to oven and bake 20–25 minutes, until center is set (very slight giggle in the middle).
- Cool completely at room temperature, then refrigerate at least 2 hours.
- Dust with powdered sugar and slice.
Notes
Related
Looking for other recipes like this? Try these:


Pin to Pinterest