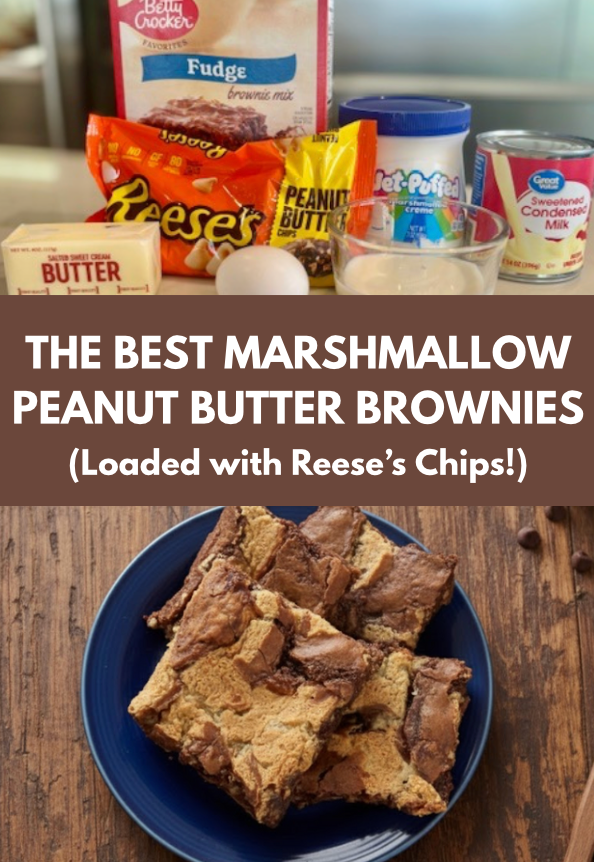
There are desserts that hit the spot when you’re craving something sweet, and then there are desserts that stop you in your tracks because they’re just that good. These Gooey Peanut Butter Brownies fall squarely into the second category. They’re fudgy, rich, and unapologetically indulgent—the kind of treat that makes you sneak back into the kitchen for “just one more bite.”
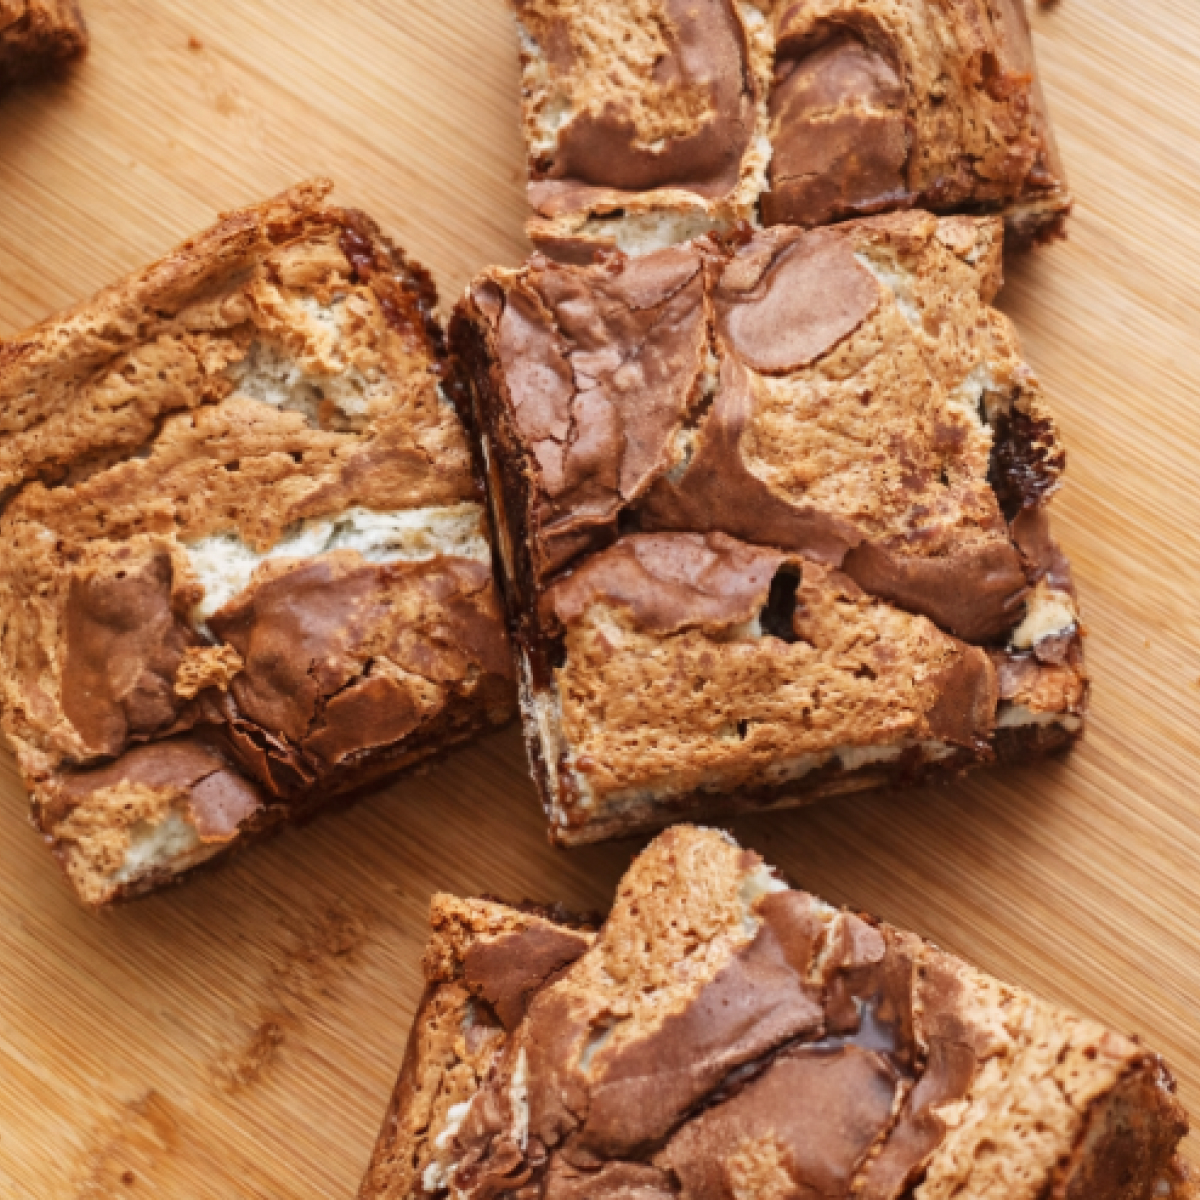
This recipe is one that reminds me of cozy afternoons when the oven warms up the whole kitchen, and everyone magically wanders in to see what’s baking. The smell of chocolate brownies mixed with sweet marshmallow and peanut butter is pure comfort. And let’s be real—peanut butter and chocolate are one of those timeless flavor pairings that never disappoint. Add marshmallow crème into the mix, and you’ve got a dessert that’s gooey, nostalgic, and a little bit over-the-top in the best way.
Whether you’re making these for a bake sale, a family gathering, or just because you want something ridiculously good after dinner, this recipe will deliver every single time.
If you love rich, gooey brownies like these, you’ll definitely want to try my Peppermint Hot Chocolate Brownies, Gooey Hot Chocolate Brownies, and Super Moist Zucchini Brownies—each one is packed with deep chocolate flavor and perfect for any occasion.
Jump to:
Why You’ll Love These Gooey Peanut Butter Brownies
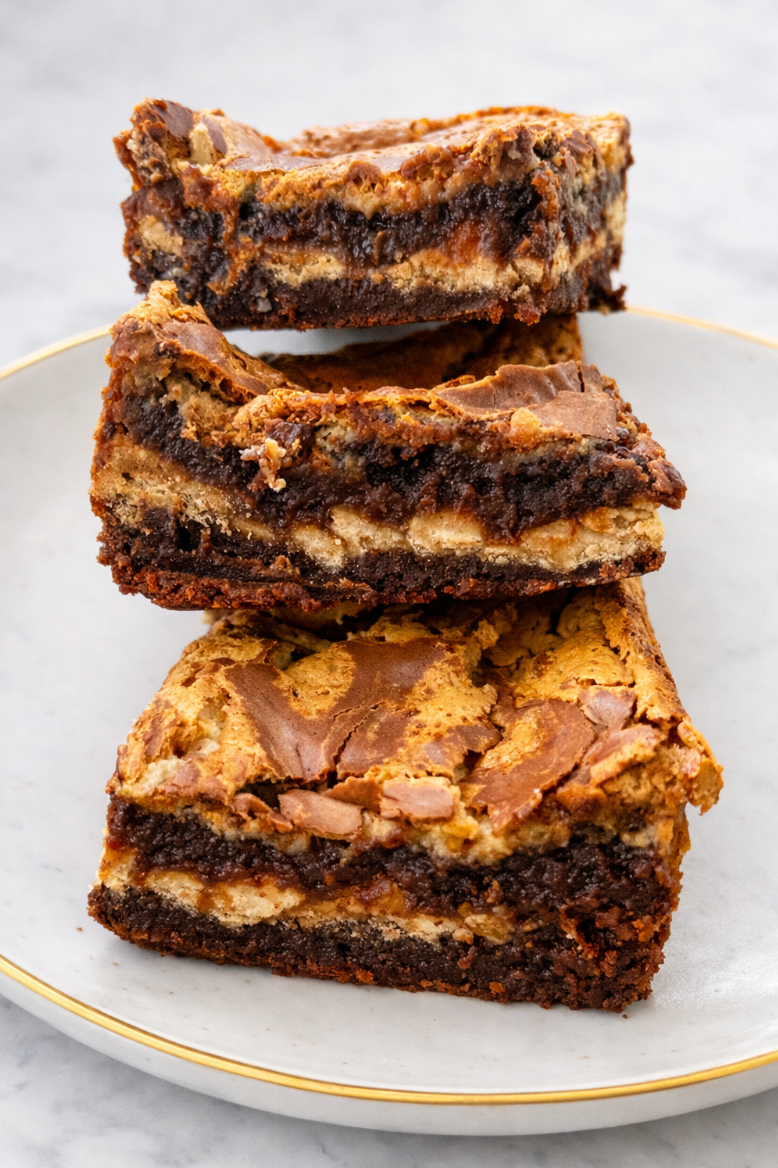
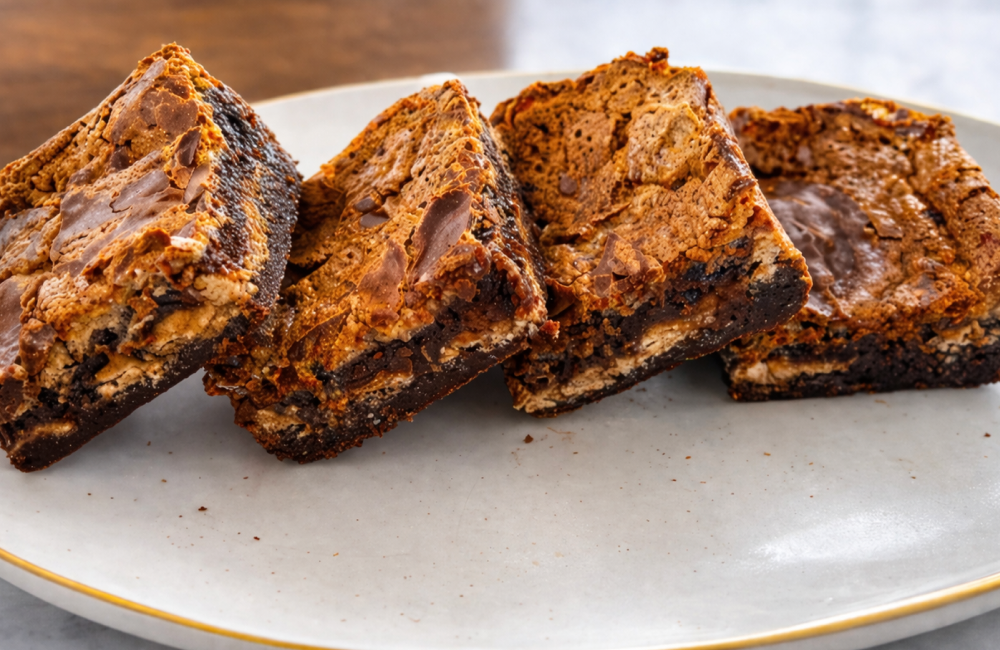
Ultra gooey, layered texture
You get the best of everything—soft brownie base, creamy marshmallow center, and a slightly crackly top.
Big peanut butter + chocolate flavor
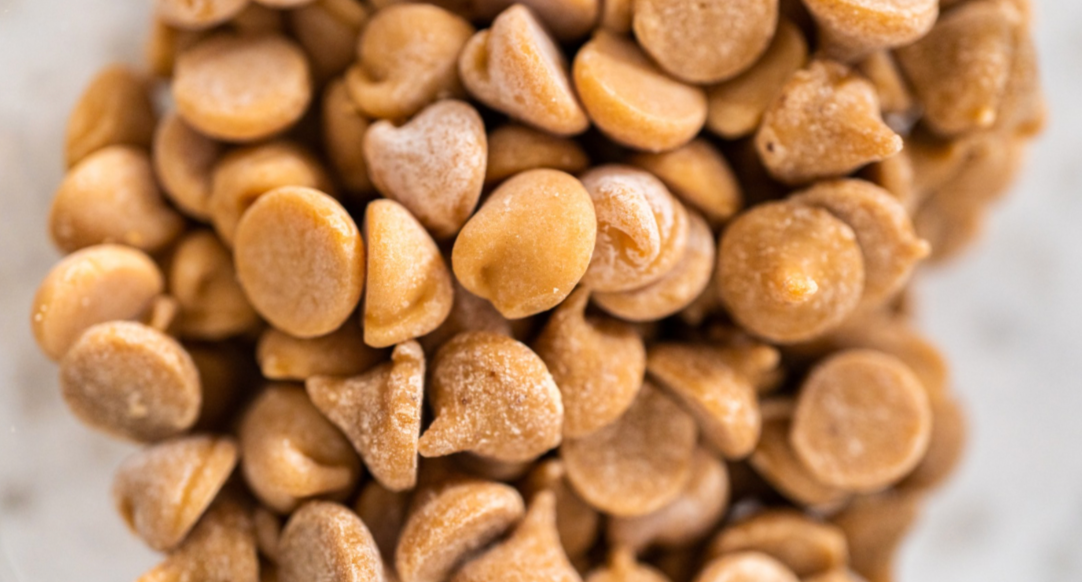
The peanut butter morsels balance the sweetness and add that rich, irresistible depth.
Easy homemade recipe (with a shortcut)
Using a brownie mix keeps this quick and reliable while still delivering bakery-style results.
Perfect for parties and dessert trays
These cut beautifully into small squares, making them ideal for serving a crowd.
No complicated steps
Simple layering and a quick par-bake are all you need—no fancy techniques required.
Stays soft and fudgy for days
Thanks to the condensed milk and marshmallow layer, these brownies don’t dry out.
Classic recipe with a fun twist
It’s everything you love about traditional brownies, upgraded with a gooey marshmallow peanut butter center.
Family-friendly and crowd-approved
This is one of those desserts both kids and adults immediately go back for.
These brownies are perfect for entertaining—if you’re planning a full menu, my party food planning guide walks you through exactly how much to serve for any size crowd.
Ingredient Breakdown
Here’s what you’ll need to make these irresistible brownies:
- Sweetened Condensed Milk – Adds richness, sweetness, and that gooey texture we’re after.
- Butter (melted & cooled) – Gives the brownies a rich, buttery depth.
- Milk – Helps loosen up the batter since it’s extra thick with the mix-ins.
- Brownie Mix – Any standard box of brownie mix works here. Choose your favorite brand.
- Egg – Just one, lightly beaten egg white, to help bind everything together.
- Marshmallow Crème – For that sticky-sweet gooey layer in the middle.
- Peanut Butter Morsels – For the ultimate peanut butter taste.
- Cooking Spray – Essential for making sure these rich brownies don’t stick to the pan.
If you ever run out of an ingredient, bookmark my baking ingredient substitutions guide—it’s a lifesaver for swapping common baking staples without affecting texture or flavor.
Instructions

- Step 1: Mix brownie mixture together.
- Step 2: Read "Special Instructions" Section on how to prep pan. Press ⅔ of mixture into a well greased pan (and parchment paper), bake for 10 minutes at 350 degrees.
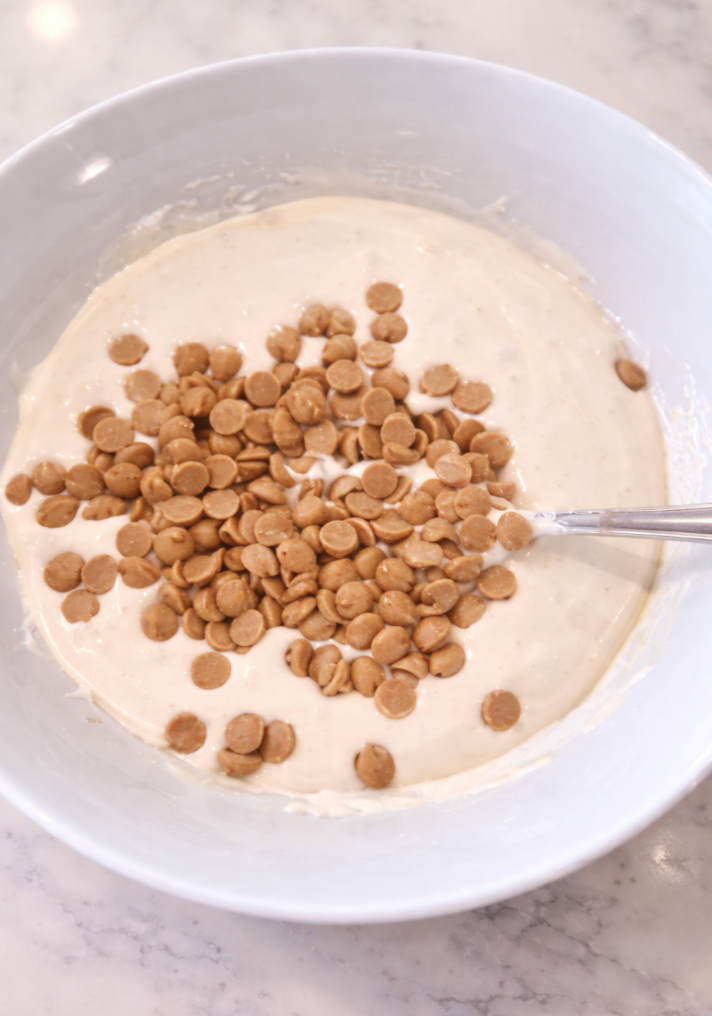
- Step 3: Mix sweetened condensed milk with marshmallow fluff and peanut butter chips.
- Step 4: Pour marshmallow mixture on top of par baked brownie. Then top with dollops of remaining brownie mixture and bake for 30-40 minutes at 350 degrees.
Step-by-Step Tips for Success
Mix with a stand mixer: The batter will be very thick (thanks to the condensed milk), so don’t worry if it feels heavier than a normal brownie batter. That’s exactly how it should be.
Spray your spatula: When spreading the brownie mixture into the pan, lightly spray your spatula with cooking spray. It prevents sticking and makes spreading much easier.
Partial bake is key: That first 10-minute bake helps set the base layer so the marshmallow mixture doesn’t sink straight into the batter.
Don’t worry about perfection: When you drop the remaining brownie batter over the marshmallow layer, it won’t cover evenly—and that’s the beauty of it. The gooey swirls on top are what make these brownies so irresistible.
Variations
- Nutty Crunch: Add a handful of chopped peanuts or walnuts into the top layer before baking for extra crunch.
- Extra Chocolatey: Drizzle melted chocolate chips along with the peanut butter for a double-swirled effect.
- Peanut-Free Option: Swap peanut butter morsels for butterscotch or caramel chips.
- Holiday Twist: Mix in festive sprinkles or colored candy-coated chocolates for a fun seasonal version.
Serving Suggestions
Serve slightly warm for ultra gooey texture
Pop a square in the microwave for 10–15 seconds to bring back that soft, melty center—perfect for rich, bakery-style brownies.
Top with a scoop of vanilla ice cream
The cold, creamy contrast balances the sweet peanut butter and marshmallow layers beautifully.
Drizzle with melted chocolate or peanut butter
A quick drizzle adds a polished, dessert-style finish that looks as good as it tastes.
Sprinkle with flaky sea salt
Just a light pinch enhances the chocolate and peanut butter flavors and cuts the sweetness.
Cut into smaller squares for parties
These are rich—bite-sized portions work best for dessert trays and crowd-friendly servings.
Serve as part of a dessert board
Pair with cookies, fruit, and other sweet treats for an easy, impressive spread.
If you’re serving these at a party or event, check out my guide on how much food for a crowd to make sure you have the perfect amount for every guest.
Storage & Make-Ahead
- Room Temperature: Store in an airtight container for up to 3 days.
- Refrigerator: Keep up to 1 week if you like a firmer, fudgier texture.
- Freezer: Wrap individual brownie squares in plastic wrap and store in a freezer bag for up to 3 months. Thaw at room temperature or microwave for a quick treat.
Want to keep your brownies fresh and fudgy longer? Don’t miss my guide on how to store brownies and baked goods so they stay soft and delicious.
Frequently Asked Questions
Q: Can I use a homemade brownie recipe instead of a box mix?
A: Absolutely! Just make sure it’s for a 9X9-inch pan so the proportions stay balanced.
Q: Do I have to use marshmallow crème?
A: It’s what makes these gooey! But if you prefer, you could substitute mini marshmallows (though the texture will be a little different).
Q: Can I double this recipe?
A: Yes, but you’ll need two pans. A single batch already fills a 9X9-inch dish nicely.
Q: How do I know when they’re done?
A: The edges will look set, and the top will have a slightly crackly texture. The center may still look soft—that’s okay, they’ll firm up as they cool.
Absolutely — here’s a clear, polished section written in your warm, instructional tone:
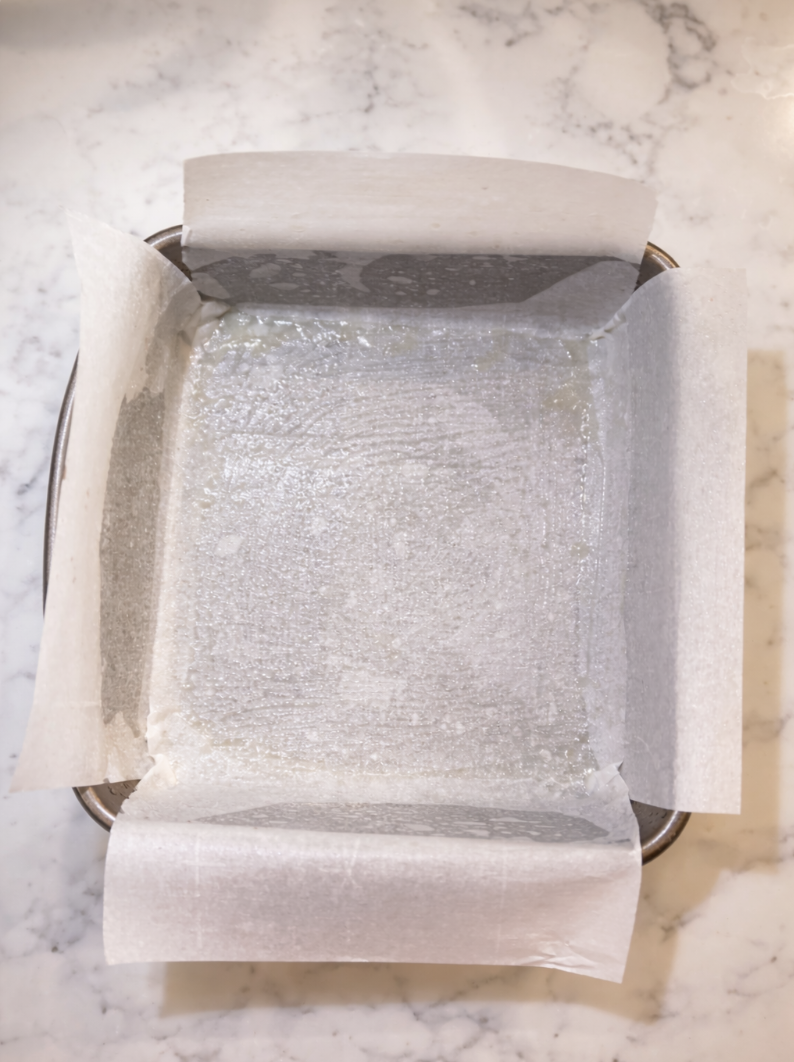
Special Instructions: How to Prepare the Pan
Proper pan prep makes all the difference with these ultra-gooey brownie bars. Don’t skip this step — it ensures clean removal and easy slicing later.
Step 1: Spray the pan first.
Lightly coat your 9x9-inch baking dish with non-stick cooking spray. This first layer helps the parchment paper adhere to the pan so it doesn’t shift while you spread the thick batter.
Step 2: Line with parchment paper.
Place parchment paper into the pan, leaving enough overhang on two opposite sides. This creates “handles” so you can lift the brownies out easily after they cool.
Press the parchment into the corners so it sits flat against the bottom and sides.
Step 3: Spray again.
Lightly spray the parchment paper with non-stick cooking spray as well. This second spray ensures the brownies release cleanly — especially important since this recipe is rich and gooey.
This double-spray method prevents sticking, makes cleanup easier, and gives you those beautiful, clean-edged squares when it’s time to slice.
Why This Recipe Works
Sweetened condensed milk = ultra moisture + chewiness
Instead of relying only on eggs and oil, the condensed milk adds richness and keeps the brownies soft, dense, and slightly fudgy even after cooling.
Par-baking the base creates structure
Baking the first layer briefly gives it enough stability to hold the marshmallow filling without sinking—this is what keeps the layers distinct instead of blending together.
Marshmallow crème adds a soft, gooey center
It melts into a creamy layer that stays light and slightly stretchy, creating that signature “gooey middle” without becoming runny.
Peanut butter morsels bring balance
The peanut butter cuts through the sweetness and adds depth, making these brownies feel rich but not overwhelming.
Egg white keeps the texture tender (not cakey)
Using just an egg white helps bind the batter while keeping it soft and chewy instead of turning into a dense cake.
Final Thoughts
These marshmallow peanut butter brownies are the kind of dessert that disappears fast—rich, gooey, and layered with that perfect balance of chocolate, peanut butter, and soft marshmallow. They feel a little nostalgic, a little indulgent, and exactly like the kind of comfort food dessert people come back for again and again.
What makes them even better is how simple they are to pull together. With a boxed brownie base and just a few add-ins, you get a bakery-style result without the extra effort—making this one of those easy homemade recipes that delivers every single time.
If you’re baking for a group, these are especially perfect. Just be sure to cut them smaller since they’re so rich—and if you’re planning for a crowd, don’t miss my guide on how much dessert to serve per person so you can get your quantities just right.
Whether you’re making them for a party, a holiday tray, or just a cozy night at home, these brownies are guaranteed to be one of those sweet treats and baked goods everyone asks for again.
Gooey Peanut Butter Brownies
Ingredients
Equipment
Method
- In stand mixer, combine ¼ cup of the sweetened condensed milk, melted butter, milk, brownie mix and egg white. The batter will be thick.
- Use Parchment paper AND no stick spray (spray Non-stick spray on top of the parchment paper) to prepare the 9x9-inch baking dish. Spread ⅔ of the brownie batter into the bottom of the pan (it helps to use a spatula sprayed with cooking spray). The layer will be thin.
Bake the base: Bake for 10 minutes at 350°F.
- In a medium bowl, stir together the remaining ½ cup sweetened condensed milk with the marshmallow crème and peanut butter morsels. Mix until smooth.
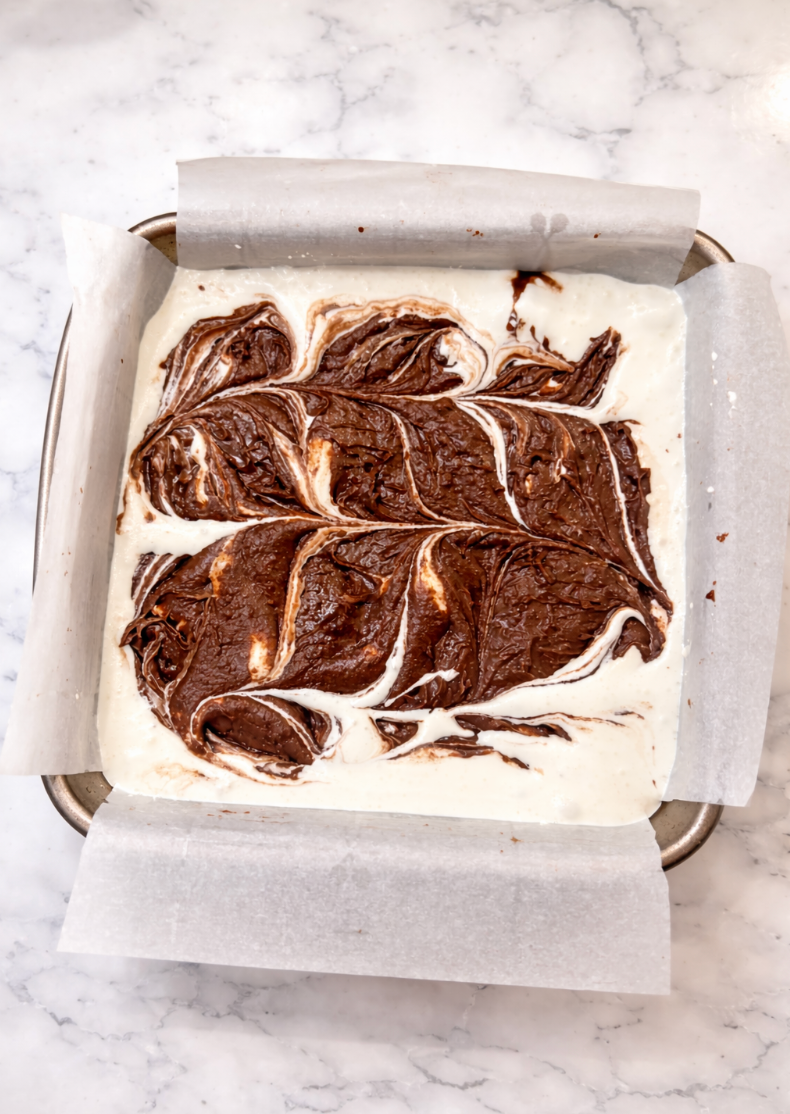
- Spread the marshmallow mixture evenly over the partially baked brownie layer. Carefully drop the remaining brownie batter by spoonfuls over the marshmallow layer. ( try to spread out the brownie batter at much possible)
- Optional step: swirl the top layer for a nicer look, being careful not to swirl the bottom layer.
Final bake: Return to the oven and bake for 35-45 minutes at 350°F, until the top looks set and slightly crackly.
- Let cool completely before cutting into squares. These are rich and gooey, so smaller portions work best!
Notes
- Use parchment + spray together: This is key for clean removal—these brownies are very sticky and gooey.
- Don’t overbake: The center should still be slightly soft when removed. They will set as they cool.
- Layering tip: Drop the top batter in small spoonfuls instead of spreading—it’s much easier over the marshmallow layer.
- Cool completely before cutting: For clean slices, let them fully set (you can even chill slightly).
- Use a hot knife: Run a knife under hot water and wipe dry between cuts for bakery-style squares.
- Swirling is optional: It adds a pretty finish, but skipping it won’t affect flavor or texture.
- Pan size matters: A 9x9 pan keeps these thick and gooey—using a larger pan will make them thinner and bake faster.
Related
Looking for other recipes like this? Try these:
Pin to Pinterest