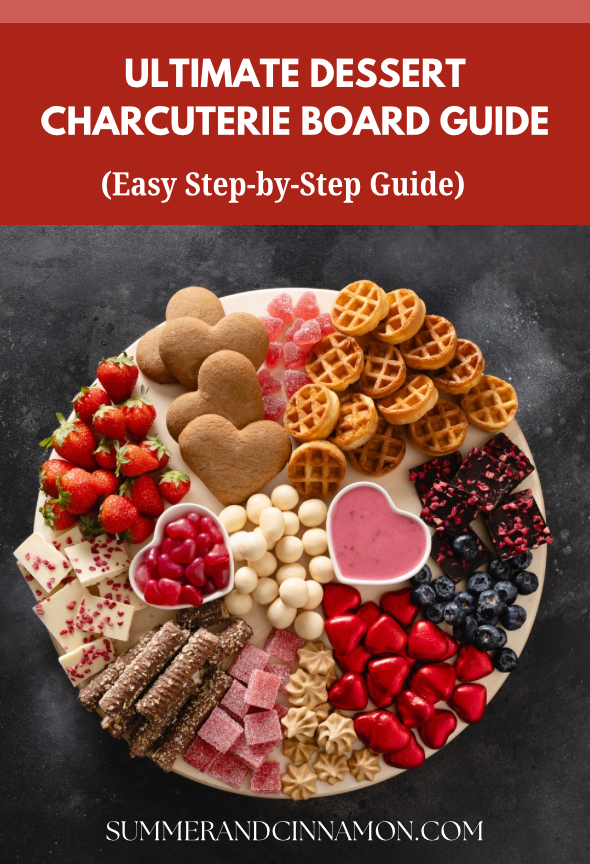
Dessert charcuterie boards are the ultimate crowd-pleaser. They’re dramatic, customizable, surprisingly easy to assemble, and instantly make any gathering feel special. Whether you’re hosting a holiday party, birthday, bridal shower, or cozy movie night, a sweet grazing board turns simple treats into a centerpiece.
The secret? Balance, texture, height, and color
This guide will walk you through exactly how to build a dessert charcuterie board that looks professional, photographs beautifully, and disappears fast!
If you’re planning a full spread, this party food planning guide with serving charts makes it easy to figure out exactly how much food you need for any size gathering.
Jump to:
What Is a Dessert Charcuterie Board?
A dessert charcuterie board is a large serving board filled with a variety of sweet treats—cookies, brownies, candy, fruit, dips, chocolates, pastries, and more—arranged in a visually appealing way for guests to graze.
Unlike a traditional meat-and-cheese board, this version leans fully sweet while still following the same design principles: variety, contrast, and flow.
Step 1: Choose a Theme
You don’t have to have a theme, but it makes selection easier.
Popular themes:
- Chocolate lovers
- Cookie board
- Brownie bar
- Holiday (Valentine’s, Christmas, Halloween)
- S’mores board
- Birthday sprinkle board
- Movie night candy board
- Brunch dessert board
- Seasonal (Fall apple + caramel, Summer berries + lemon)
A theme keeps your board cohesive instead of chaotic.
Step 2: Pick Your Board Size
The size depends on guest count.
Serving Guide:
- 2–4 people: 12–14 inch board
- 6–8 people: 16–18 inch board
- 10+ people: large rectangular board or multiple boards
Pro tip: Bigger is easier. A crowded board looks intentional. A half-empty board looks unfinished.
Step 3: Build Around 5 Core Categories
A balanced dessert board includes contrast. Think in categories.
1-Anchors (Large Items)
These create structure and height.
Examples:
- Brownie squares
- Mini cupcakes
- Sliced cake
- Donuts
- Large cookies
- Hand pies
- Cinnamon rolls
Place these first. Spread them out evenly so the board feels balanced.
If you’re adding brownies or dessert bars to your board, this dessert bars per person guide will help you plan the right amount for your guest count.
2-Crunch & Texture
You need contrast against soft items.
Examples:
- Biscotti
- Pretzels (sweet or salted)
- Chocolate-covered nuts
- Meringues
- Waffle cones
- Wafer cookies
Texture makes the board interesting.
Planning to include cookies? Use this how many cookies per person calculator to make sure your board is perfectly portioned for your crowd.
3-Fresh Elements
This keeps the board from feeling too heavy.
Examples:
- Strawberries
- Raspberries
- Sliced apples
- Grapes
- Orange slices
- Dried fruit
Fresh fruit adds brightness and visual relief.
4-Fillers (Small Bite Items)
These fill gaps and make everything look abundant.
Examples:
- Truffles
- Chocolate squares
- Caramels
- Mini marshmallows
- Peanut butter cups
- Candies
Drop these in last to fill holes.
5-Dips & Sauces (Optional but Elevated)
This makes your board interactive.
Examples:
- Chocolate ganache
- Caramel sauce
- Cream cheese dip
- Nutella
- Whipped cream
- Marshmallow fluff
- Cookie butter
Place dips in small bowls before filling around them.
Step 4: How to Arrange It
Follow this order for a professional look:
- Place small bowls for dips.
- Add large anchor items around the board.
- Add medium items (cookies, pastries).
- Layer fruit in clusters.
- Fill empty spaces with small candies.
- Add height by stacking or leaning items.
- Finish with a light dusting of powdered sugar or chocolate drizzle (if appropriate).
Work in clusters, not straight lines. Charcuterie boards should feel organic, not symmetrical.
Step 5: Add Height & Drama
Flat boards look boring in photos.
Ways to create dimension:
- Stack brownies
- Lean cookies against bowls
- Use cupcake liners
- Add small cake stands
- Layer parchment under sections
- Use crumpled parchment for texture
Height makes it look abundant and luxurious.
Step 6: Balance Color
Color balance is subtle but powerful.
If everything is brown, add:
- Strawberries
- White chocolate
- Powdered sugar
- Bright sprinkles
Aim for contrast:
Dark chocolate + white frosting
Golden pastries + red berries
Caramel tones + fresh fruit
Step 7: Final Touches
These tiny details make it look styled:
- Sprinkle flaky salt on chocolate
- Dust powdered sugar lightly
- Add fresh mint leaves
- Add edible flowers
- Use decorative toothpicks
- Include small dessert tongs
Equipment Used
You don’t need much, but a few items make the process smoother.
Essential Equipment:
- Large wooden serving board (or marble slab)
- Small ramekins or bowls for dips
- Offset spatula (for arranging soft items)
- Parchment paper (optional layering)
- Sharp knife (for slicing brownies/cakes)
- Small tongs or dessert forks
- Heart shaped serving board
- Christmas tree serving board
Optional but helpful:
- Mini cake stands
- Decorative cupcake liners
- Cookie scoops
- Squeeze bottles (for chocolate drizzle)
I’ve linked all my favorite baking tools on my Shop My Kitchen page if you’d like to see what I use regularly.
Make-Ahead Tips
You can assemble most boards 2–4 hours in advance.
To keep everything fresh:
- Store covered lightly with plastic wrap.
- Add fresh fruit right before serving.
- Add whipped toppings last minute.
- Keep dips refrigerated until ready.
If using sliced apples, toss in lemon juice to prevent browning.
How Much Food Do You Need?
Plan about:
- 4–6 dessert pieces per person
- 2–3 cookies per person
- ½ cup fruit per person
- 1–2 tablespoons dip per person
It’s better to slightly overfill than under-fill.
Not sure exactly how much dessert to include? This dessert table portion guide for crowds helps you build a board that looks full without overbuying.
Dessert Charcuterie Board Ideas by Occasion
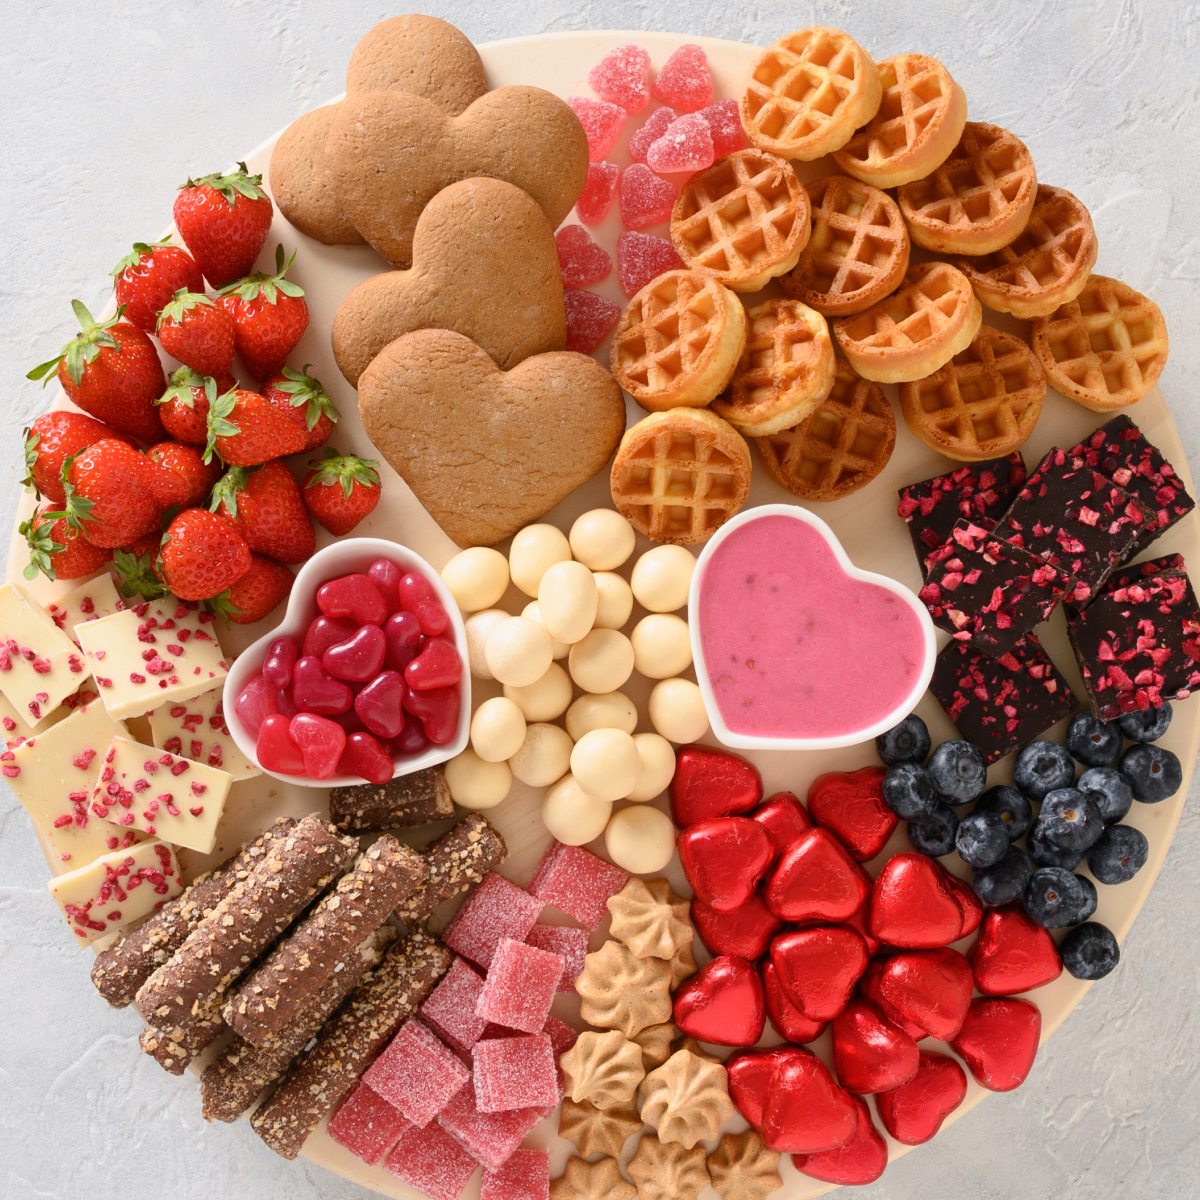
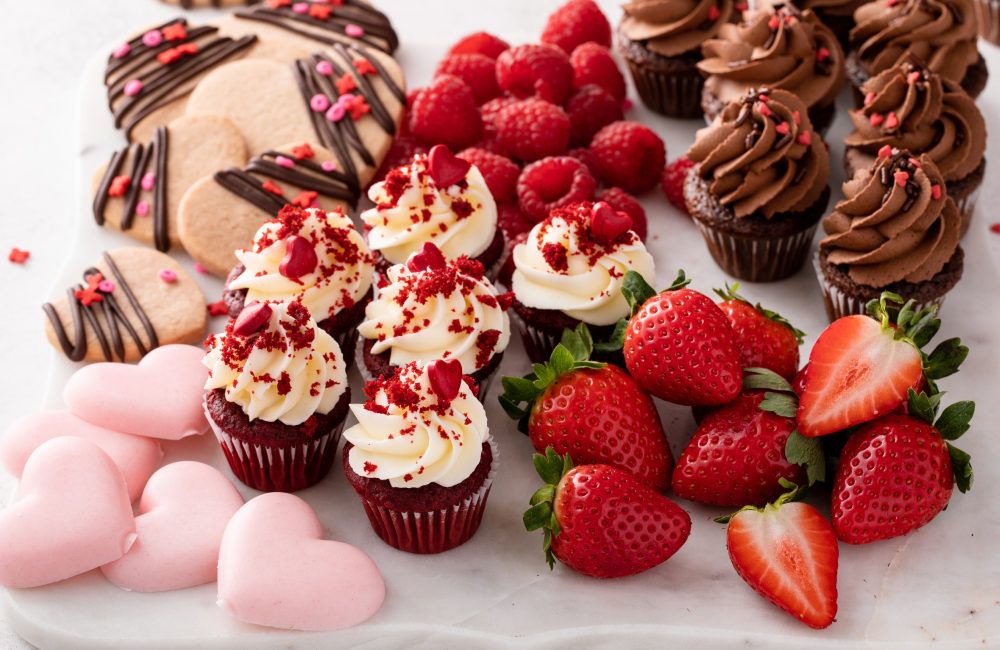
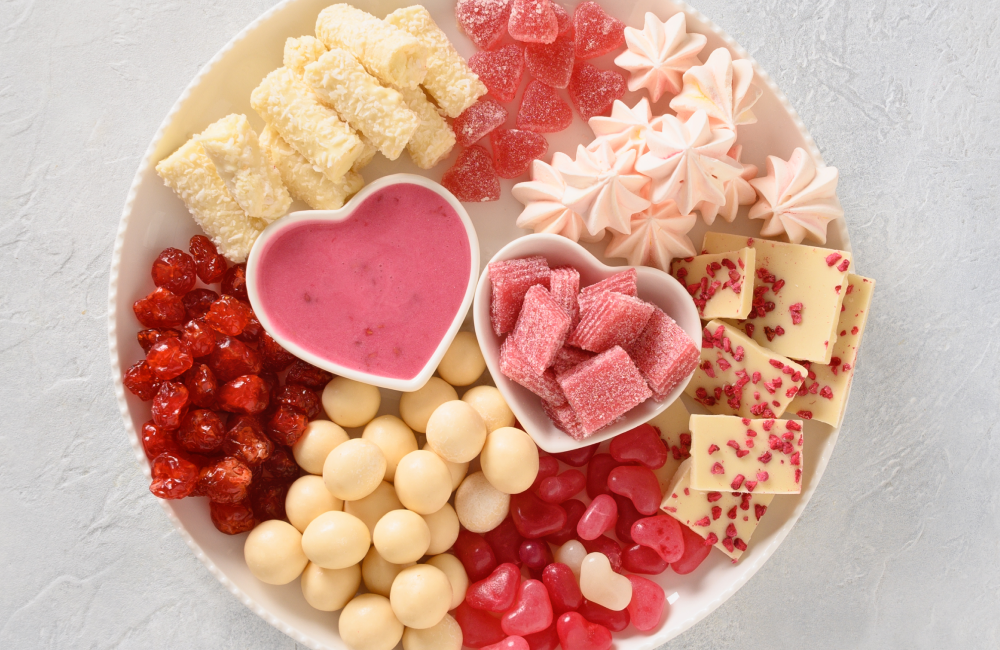
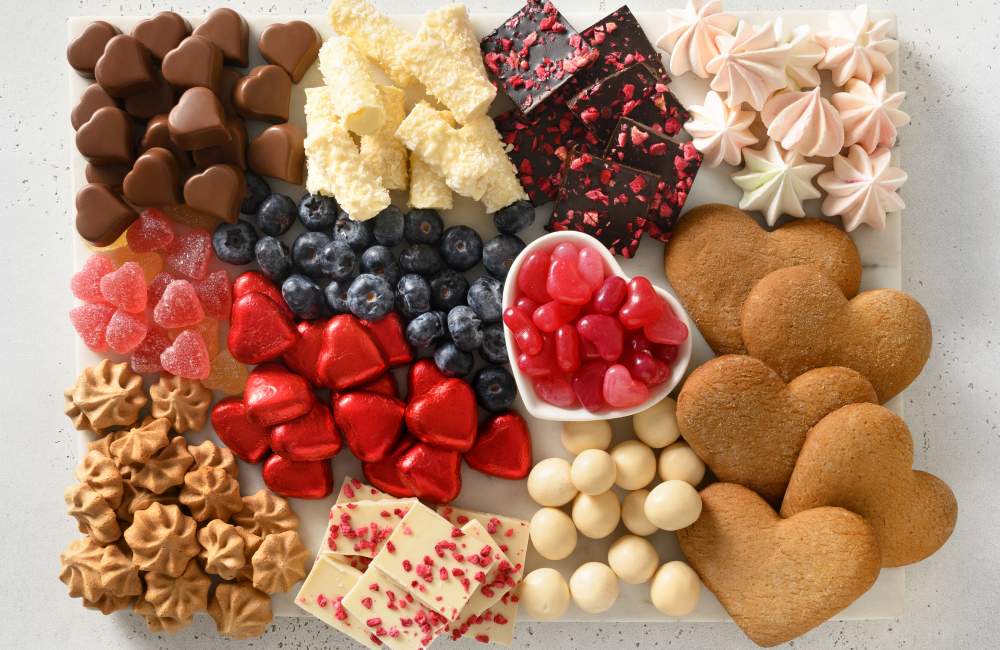
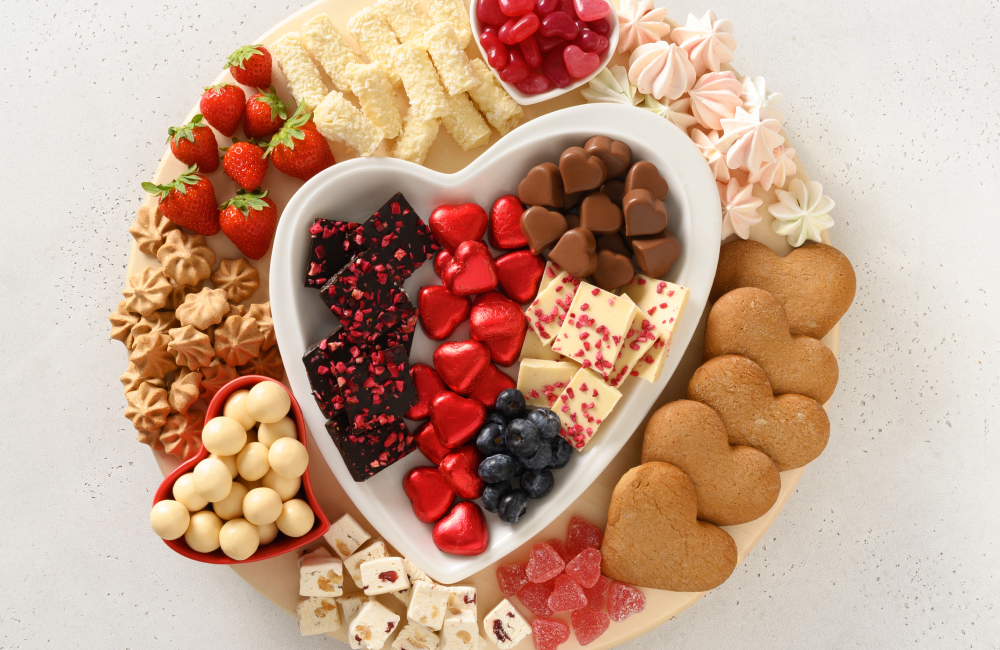
Valentine’s
Strawberries, chocolate truffles, pink macarons, heart cookies.
Fall
Caramel apples, pumpkin bars, maple cookies, cinnamon sugar donuts.
Christmas
Sugar cookies, peppermint bark, fudge, gingerbread, red and green candies.
Movie Night
Popcorn, candy bars, chocolate chip cookies, brownie bites.
Kids Party
Mini cupcakes, colorful candies, chocolate-covered pretzels, sprinkles everywhere.
Common Mistakes to Avoid
-Too many similar textures
-No fresh elements
-Huge empty spaces
-Only one color
-Overcrowding dips
-Forgetting serving utensils
Why Dessert Boards Work So Well
They:
- Feel luxurious without being complicated
- Encourage interaction
- Work for all ages
- Photograph beautifully
- Allow you to use homemade OR store-bought items
You can bake everything from scratch, or mix homemade brownies with store-bought cookies. No one will complain.
Final Thoughts
A dessert charcuterie board is less about perfection and more about abundance. The goal isn’t symmetry. It’s generosity.
When it looks full, varied, and layered — you’ve done it right.
And once you build one, you’ll realize how flexible they are. You can use leftover cookies, seasonal fruit, pantry candy, or bake a few hero items and build around them.
It’s entertaining made easy — and it always impresses.
The Ultimate Dessert Charcuterie Board
Ingredients
Equipment
Method
- Prepare and arrange beautifully!
Related
Looking for other recipes like this? Try these:
Pin to Pinterest